Sunday, May 15, 2011

BSOs and Bicycle Comics

Todays Yehuda Moon and the Kickstand Cyclery strip had me reading the comments. I have never heard the Bicycle Shaped Object (BSO) term before, but I knew immediately what it was and I could see any number of them in my mind. I feel a sense of remorse when I agree to tune one because I feel the customer is wasting their money, but the response is always the same: "Well that's less than a new bike and I don't want to spend $600". So I shake my head, say yes and take their bike in.


Here is a great article lamenting the pain that BSOs bring to mechanics. We're not bike snobs (which is what most people think we are for bashing the BSO).

Tuesday, May 10, 2011

A Fixie For Fashion

I have been riding fixed gear for about 5 years and I have always ridden with brakes. My first bike utilized a suicide hub (an old thread on freewheel hub with a track cog and an lock ring) on a 1981 Nishiki Competition, a nice bike. I spun the cog off multiple times before accepting I would not be able to skid stop. I road some old Normandy hubs laced to Araya rims for many years. Eventually, those original wheels made it onto a 1975 Jeunet made of  Reynolds 531 steel, which was a lot more fun than the Nishiki though it was more of a “sport” bike than a race bike. I always believed it was the 531 that made the difference.


The Jeunet was flawed though. It had been repainted and braze-ons were added in the 1980s. I filed the retrofitted shifter bosses off as I sometimes got caught on them when skidding. This bike was a general all weather beater and this took its toll on the hubs and wheels. Eventually I had to retire the old wheels and it was time for a real set of track hubs. What is more tried, tested and true than Phil Wood? Nothing. I built up three cross 36 hole wheels with DT Swiss spokes to Nisi Mixer rims harvested from and all original 1988 Marinoni with low miles. Being from France and the mid seventies, the Jeunet had French threading, but the bottom bracket had been tapped to Italian at some point. The threads were a mess and it was always a challenge to change bottom brackets which happened from time to time as I did maintenance or swapped cranks. At one point I cracked a vintage TA specialties non-drive crank arm. The Jeunet was tired and I wanted something with forged dropouts instead of the stamped ones it had. So I kept my eye out for a particular type of frame. I wanted something from the mid-1970s to early 1980s because that is the period when the following features were most common: clearance for full wrap fenders and eyelets for fenders, forged dropouts, fewer braze-ons (especially not for shifters), and Reynolds 531 double butted steel. Lastly, the frame would need to be English threaded.


 An interesting bike caught my eye on used Victoria in the summer of 2010. It was a Mairag, made in Switzerland. The seller had used a photo of perhaps the only Mairag documented on English internet and advertised Zeus components. The price was good for a potential flip and strip and I knew some people the frame might fit. Of course, I was assuming the photo was the bike for sale and estimated the size based on that. When I showed up I found a bike in my size meeting the above criteria though lacking the fender eyelets on the front fork. Close enough. I bought it and stripped and hung the frame up to wait for a time when I could swap the parts from the Jeunet. I had Fairfield Cycles braze on some eyelets.

Back to the Jeunet, the Nisi rims did well until a dark night on an unfamiliar road brought me right on top of a chasm of a pothole formed at the seam of two different asphalt applications. It left such a massive flat spot in the rear rim the bike almost audibly thumped when riding, but miraculously did not flat. Not having a rim on hand to rebuild the rear wheel I build the Jeunet up as a single speed with spare parts and sold it. My new fixed gear would come later.

After several months I took the frame to Jim at J&B auto parts group on Oak Street in Victoria and asked him to replicate the original paint colour, while masking the head badge. I ordered a Mavic open pro rim in grey anodizing to rebuild the rear wheel and did so with DT Swiss double butted spokes. I knew from all my headaches with old cranks that I wanted something more dependable and when some 172.5mm Ultegra Octalink cranks fell into my lap I simply ordered an appropriate track ring for them. Being that this was a fresh build I wanted to have fun with it. I decided a brown on pearl colour scheme would be great with my Brooks Professional Saddle and ordered some Fixation brown on white tires and a set of wooden grips to finish it off. The Nitto bars are based on Italian CafĂ© bars from the 1960s and 1970s and I had procured them from an old Sekine city bike and always wanted to give them a try. The Chris King headset I traded for with a Super Record and it had been waiting for the right project. I also had the first generation super record post fall into my lap for $10 at the Oak Bay Bicycles Swap meet last summer. The new fixed gear was born with every intention of putting the moustache bars with Campy Record brakes and some alloy fenders back on. However, as I road it the first few times to show it off and take some photos something happened. I actually enjoyed the new awareness that riding brakeless brought. It required a greater appreciation for the road around you and paying extra attention. Though it was slower the simplicity was appealing. So as we wait for the Victoria summer to finally take hold I’ll be riding brakeless and fenderless till next winter.


Saturday, April 23, 2011

Stewart Mountain High

Victoria is home to some great mountain biking and there is something for every riding style. Here on the west coast we sometimes ride our cyclocross bikes on trails better suited to cross country mountain bikes, but the challenge is part of the fun. However, when you want a light ride you can’t help but grin as you rip fast single track and decommissioned forest service roads on something like my new Giant Anthem X1 29er. These sometimes cyclocross sometimes cross country mountain bike were the trails I visited today.


Today was the first ride on my new rig and I wanted to do something easy to get to know my new friend. 29ers are supposed to be fast and climb well so I decided to put it too the test and climbed up Stewart Mountain. I entered the trails at the end of Bates Road (off Baker, off Highland road winding through Thetis Lake Park). The Anthem climbed like a champion and I was able to clean sections of trail I never could on a cross bike or my 2010 Giant Trance X2. The Shimano Dyna-Sys drivetrain is a major improvement over the previous 9 speed systems. Shifts are clean, crisp and reliable; the feel is more solid and gives a satisfying click. The new system pulls more cable making is less susceptible to contamination and housing degradation. This is a huge plus. As usual the Fox suspension is incredible and I was even impressed with the performance of the Maxxis Crossmark tires. After getting to the top of Munn road the only logical choice was to bomb back down the way I came and head back on Highland road. That was followed by a quick cut back to Munn road on the old Highland road trail and shooting out down to Prospect Lake Road and Home. It’s going to be a good summer of riding on the island. Tomorrow the Anthem learns some more challenging terrain at The Hartland 


Saturday, March 5, 2011

Increase your mechanical advantage (getting more from your cantilever brakes)

Cantilever brakes are often sighted as the bane of many mechanics. . That the bicycle was invented in France is debatable, but one thing is certain: the cantilever brake was invented in France and is over half a century old. It is one of the original bicycle rim brake designs. Cantilever brakes can be beautiful and mysterious, just like French women (Okay sorry that is bad, but I'm leaving it)

.

While there are several online articles that should be enough to allow anyone to set up their cantilevers with good results (e.g. Sheldon Brown), one intelligent cyclist has taken it a step further and produced an article outlining how the cantilever brake works (Cantilever Brake Geometry by Benno Bulhumeur). One of the clearest results, and often the easiest adjustment to make, is that lowering the cable yolk always increases mechanical advantage. While this may not be possible with the later cantilever designs utilizing a cable splitter instead of a yolk it is true for pretty much every cantilever brake made prior to 1990. This simple adjustment jives with my experience and I always set-up cross bikes so that yolk is just above the bolt hole in the stay bridge or fork crown. Often it pays to install fenders first and then make the final adjustment to the yolk height.

Sometimes cantilever brakes can have too much mechanical advantage. These are the brakes that feel really spongy and have too much lever throw. This is usually related to poor lever and brake pairing, but it can also be the brake set-up.


The article points out that the oft sighted rule of thumb of having a 90 degree angle between the straddle wire and the lever arm of the brake is not only flawed, but can be totally inappropriate for some brakes such as low profile brakes mostly used in the 1990s on mountain bikes. I believe, that low profile cantilevers are the reason many mechanics have frustrations with them. If you play with the yolk height for the low profile cantilever on the interactive cantilever set-up calculator you will see that mechanical advantage decreases rapidly as you increase yolk height. While the brake arm is static, keep in mind that the power is also related to arm position and as the pads wear the arm can become dangerously close to parallel with the braking surface in which case you loose a lot of power. For this reason the brakes should be set-up with the pad as far inboard on it’s mount as is feasible (i.e. arm is further out). This article and the interactive calculator should be able to help anyone better understand cantilever set-up and can help you choose the type of brake that is best for you. It nicely displays why the early Shimano Deore XT cantilever was one of the best. It was a medium profile design and had a fool proof set-up. Enjoy!


-VBN

Monday, February 21, 2011

Review: Mission Workshop Rondel Sneaker


If someone asked me to describe the perfect shoe for my day to day lifestyle I might have described something almost exactly like the Rondel Sneaker. My wish list would be something like this:

A casual and good looking full leather sneaker with full leather upper and a stiff sole (i.e. it must have a shank), it would fit into toe clips should I want to use them for that, and perhaps be SPD compatible.

I wouldn’t have made comfort specifications but it should be comfortable and durable.
This new sneaker from Mission Workshop, based in San Francisco meets my basic description. Indeed it has a full leather upper, it looks good, it has a shank and it can take SPD cleats. I love the concept. This is a new product and as such your expectations should not be set to high. This shoe is as much casual as it is functional. Unfortunately, they do not come in half sizes and I had to choose between too tight and too loose. I had to go with too tight as the bigger size was unwearable. There is a ton of heal slop which is due, in part, to the stretchy laces; replace immediately (Black looks better anyway). Next I noticed the left shoe was tighter, which was odd since most commonly the right foot is bigger. I checked and I fit the norm, so I checked the shoes. The sole of the let shoe is an eighth of an inch shorter in my pair, size 45(11US). I contacted the company and received no reply. The shoes are made in China and perhaps quality control isn’t the best for this first run. I also noticed that the cleat tracks were in grossly different places on each shoe. Thankfully, the adjustment in the cleat could compensate for that. Depending on your size you may also find that you have to move the cleat as far to the inside as possible for the shoe to clear the crank-arm, kind of annoying. I even had to put pedal washers on one set of shimano SPDs. The construction of the shoe could stand for some more attention to detail.

Thankfully the shoes have stretched to some extent and are bearable. The leather quality seams spotty and I treated them with neutral shoe polish immediately. It didn’t take much rain to still put a nice wear mark on the toe (one day on the polo courts). The sole is a rip-off of a classic vans slip-on and I am sceptical about how it will hold up, but seems okay so far.

Overall, I am happy with the shoe because I can finally ride to the bar or restaurant and walk inside wearing exactly what I road there in and not look like I road there. The shoes mesh with my sense of style and I am pleased with the product. However, there isn’t much competition out there. You can pick up a hiking style shoe from almost any cycling shoe manufacturer for under one hundred dollar and the quality of the sole and the construction quality will likely be superior to the Rondel, but it won’t look half as cool. And lets face it fashion is just as important as function in the urban jungle.

-VBN 

Monday, February 7, 2011

Try IGH

Most bike nerds would argee that an internally geared hub is, in theory, the ideal set-up for touring. While discussion of the exact ranges of IGHs vs. traditional derailleur systems would make this post useful it is beyond the scope of this blog, for the moment. Suffice to say, that IGHs generally do not have as much range as derailleur systems and by virtue of their fewer speeds they have larger jumps between gears. The Rohloff hub is the most advanced to date, with 14 speeds it covers more range than any other IGH. You can also skew your hub to the high or low gear range based on your cog and chainring selection. Shimano and Sram are up to 11 speeds but still do not have quite the range of a Rohloff , but they are a fraction of the price. 

Recently, I had a customer who wanted to give his 8 speed Shimano Nexus IGH equipped bicycle more range. He is riding across Canada this year and does not want to lose his high gear to by skewing his hub to the low with alternative cog and chainring combinations as he will need them to cross British Columbia. He began to ask me lots of questions about what was possible with individual parts and at first I was reluctant to entertain him. My initial reaction was that what he wanted to do was unreasonable; he would be far better off purchasing bike with derailleurs, but that was before I knew he already owned the bike. So I suggested he returned with his bike before we took it any further. I looked at his bike and ordered the parts he wanted. This is what his bike looked like to start. On chainring, one cog and an eccentric bottom bracket to tension the chain.


What he wanted to do was add multiple chainrings so he decided on a triple and I brought in a Shimano Alfine chain tensioner, a triple front derailleur and a triple crank. He came up with a Shimano MTB shifter. Everything went together surprisingly smooth. I rotated the bottom bracket to the lowest position to make his center of gravity as low as possible for maximum loaded stability. Everything adjusted and a new chain installed, it worked surprisingly well. The shortfall of this retrofit is the jump between gears remains wider than an 8 speed cassette and there are high and low gears that he will never use because they are too extreme. I am also concerned about the torque that will be generated in the extremely low gears, but he was intent on the conversion so I made it happen. It was a fun job and a cool experiment. I had to use a clamp on housing stop for the front derailleur right about the bottom bracket to make it work and I must say it all turned out pretty clean.


-VBN

Thursday, January 27, 2011

Saddle Up!

The bicycle saddle is a very personal thing and there are different types for different bikes. When it comes to road bikes saddle choice is often gets very particular and people become very attached to their saddles. While there are hundreds of different saddles for each type of bike (road, mountain, commuter etc.), certain models have become more popular than others. Every once in while one manufacturer seems to hit the nail on the head and make a saddle that a large portion of the pro ranks and recreational riders find very comfortable. Let’s take a look at a few of those saddles.


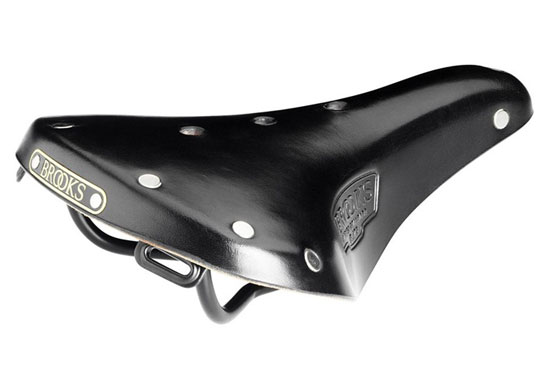
 The ubiquitous Brook B17

The first bicycle saddles were made out of leather just like a horse saddle. Most people today will recognize the Brooks brand as the most ubiquitous leather saddle ever made. Brooks’ fame is for good reason. They make a saddle designed for any rider from wide saddles with many springs (who needs a suspension seatpost?) to narrow minimalist racing saddles with titanium hardware. Perhaps the most well know is the B17 standard, having been around for over 100 years it is probably the oldest saddle design still in production. This is an all round saddle that is best suited to a position which places the handlebars at or above seat height. It is designed for a slightly more rotated back pelvic position than that of a road racing bicycle. As such, it makes and excellent mountain bike, touring and commuting saddle and is enjoyed by many. It is worth mentioning that there were many other great leather saddle brands such as Wrights of England, and Ideale of France.


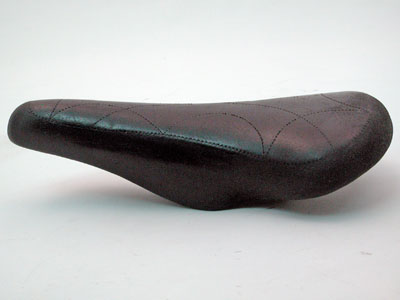
The Cinelli Unicanitor

The most popular racing saddle from brooks has to be the professional. The professional, or team pro, was amoung the most popular saddles in the pro peloton during the leather saddle era, which ended in the 1970s with the introduction of the plastic saddle. One of the first and most popular plastic road saddles was the Unica saddle, later renamed the unicanitor and co-branded with Cinelli (Italian manufacture of fine racing handlebars and stems). This new plastic saddle just seemed to work for many racers and it didn’t need as much break in time as the leather saddles, plus they were much lighter weight.


From left The San Marco Rolls, Concor and Regal

The 1980s saw the introduction of many new brands and styles of plastic (usually leather covered) racing saddles. Some of the most popular included the Turbo by Selle Italia and three models (Concor and later Rolls and Regal) by Selle San Marco. Through the 1990s one of the most popular racing saddles was another Selle Italia design, the Flite. I am not sure how much research went into anatomical design on these saddles but I am going to guess that it is very little. I think they just happened to do a bit of testing and luck out. I should also give a mention to the Avocet Touring series saddle which was very popular for touring and sport touring.

The Selle Italia Turbo reissue

Today there is a newcomer to the family of all time classic saddles (many of which have returned to production including the Regal, Rolls, Turbo and Concor) and that is the Arione by Fi’zi:k. Although Fi’zi:k manufactures several models, and most are quite popular, the Arione is the standard. The Arione is my personal go to saddle. I have tried many different saddles on my racing bikes, but every time I get back on an Arione I am reminded why it remains my mount of choice. Please post your personal favourite for others to consider. Remember that saddles are very personal and the best way to find the best for you is to put lots of miles on lots of saddles.
The Fi'zi:k Arione

-VBN